Blessings Board
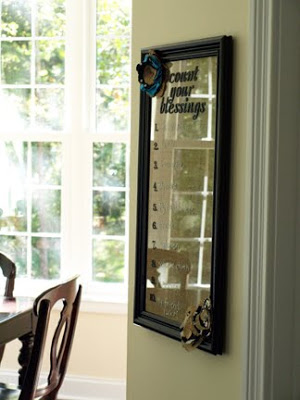
I’m spoiled. And so are my kids. And so are you. And your kids. I know this first of all because I’m typing this as I sip my super-yummy coffee, wearing my super-cozy zebra jammies in my super-cozy home. And because you’re reading it in yours. And we both know that’s only the beginning.I have personal friends who live in a third world country who have far less than this, and still they’re so happy. I don’t recall ever hearing them whine or complain. And yet it happens in our house daily. And from what I’m reading on some blogs, it’s happening in other houses, too. I get all over my kids for doing it, yet I turn right around & do it myself sometimes. I’m kinda over it. So that’s how this project came about. I call it our Blessings Board. Sounds a little cheesy? Maybe. But I have to say, it’s harder to complain when you have so many things to be thankful for staring at you in black & white. 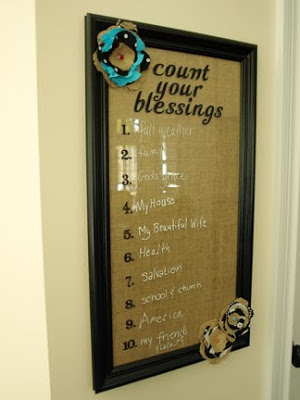 It’s our family list of things we’re thankful for. We each wrote some things we recognize as our blessings. The kids love it. And Lily (age 7) said it’s really our prayer list of things we need to thank God for. It made me so proud & so ashamed at the same time, since I hadn’t thought of that myself.
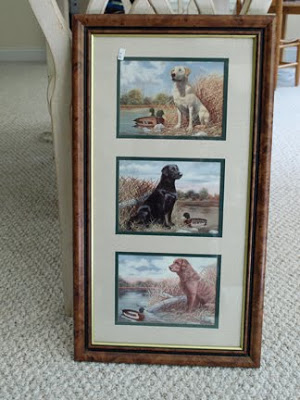
 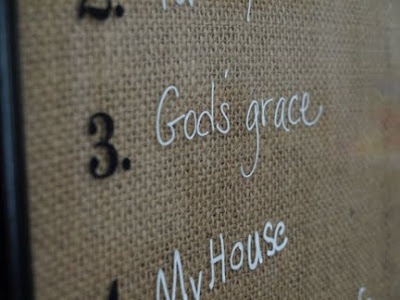 Ours will stay up thru Thanksgiving, and we’ll change the list out each week. I hope it changes us, too.I’m posting the instructions here in case you think your home needs one of these.I started with this thrift store framed dog picture (precious, I know) and carefully removed the glass & spray-painted the frame black. Let me emphasize that anytime you are removing glass from a frame that you be really careful & use gloves if you have them because the edges can cut you. Trust me.
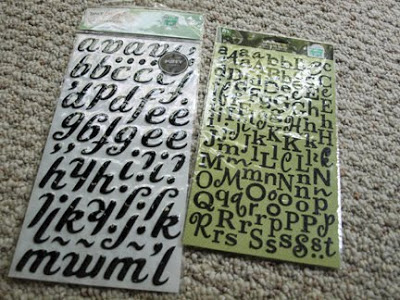
  After that, I cleaned the glass really well & got ready to add the letters & numbers. I found these stickers at Hobby Lobby & there were enough of each letter or number that I only needed one pack of each! (Such a blessing.)
  A good way to apply the letters in straight lines is to make some “guidelines” by sticking painter’s tape on the back of the glass & measuring or leveling to get a straight line.
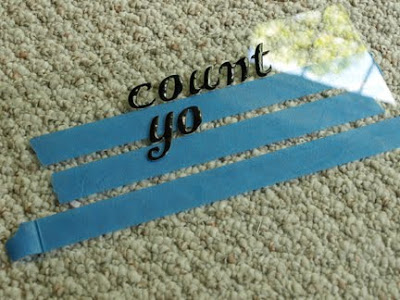
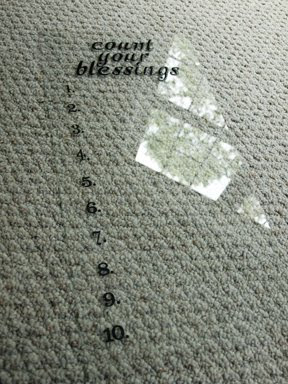 Once I stuck on all the letters & numbers, I added some burlap in between the glass & the backing & then put it all back together.
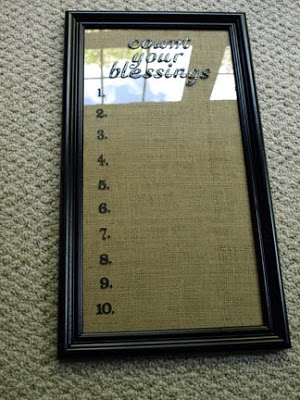 For just a little more detail, I added 3 layered fabric & burlap flowers & hot-glued them to the glass.
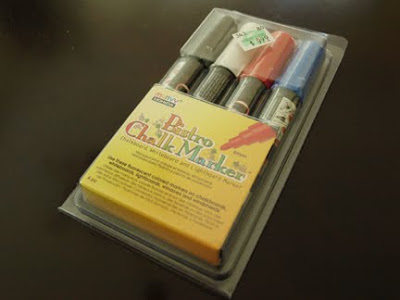
 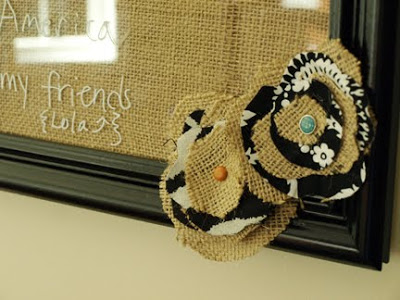 That’s it! You can write on it with regular dry-erase markers or these great Bistro Chalk Markers (also at Hobby Lobby. Use your 40% off coupon & get them for $6!).







October 8, 2010 @ 1:40 am
love it!
October 8, 2010 @ 2:01 am
Clever, and a great family activity.
October 8, 2010 @ 2:03 am
So sweet, so cute and SO necessary!!!!!! Thank you for such a neat idea. Hugs from Texas, Tara
October 8, 2010 @ 2:04 am
Visiting from Fingerprints on the Fridge! I love, love, love this and I love Hobby Lobby, I am so envious that you live near one! 🙂
October 8, 2010 @ 2:13 am
Another fantastic idea, Julie! Love it.
October 8, 2010 @ 2:13 am
What an awesome idea! I am totally stealing this!!!
October 8, 2010 @ 2:31 am
That is one fabulous project. And one way or another, we ALL need one of these in our homes!
October 8, 2010 @ 4:00 am
Wonderful Idea! definitely stealing this one! I just stumbled on your blog today and I'm enjoying all the projects you've posted! love inspiration! thank you!
October 8, 2010 @ 12:47 pm
Love it!!! Thanks, Julie.
October 8, 2010 @ 5:25 pm
I LOVE it! My daughter has been wanting to make a "prayer wall" in our house which I think is a great idea…just trying to figure out where to do it but it would allow us or anyone who comes into our home to write their requests on the wall and we will as a family pray for them. I love this idea too so might have to figure out how to do both 🙂
October 8, 2010 @ 8:23 pm
That is fabulous. I love how it is a great reminder and pretty to look at at the same time. Great idea. I'll be saving this one for sure.
October 9, 2010 @ 12:08 am
Great idea and reminder to be thankful! I think I may use a version of this in my classroom. Thanks for sharing!
October 9, 2010 @ 1:09 am
This is such a sweet idea! I really like the versatility by using the chalk markers! Thanks for showing us how! I also think this would be a great gift idea!
October 9, 2010 @ 2:06 am
So perfect! Now I am going to feel guilty of I don't make one of these!!LOL!
Thanks for sharing your great idea!!
Tasha
P.S. I am your newest follower!!
October 9, 2010 @ 3:26 am
This is SO adorable! Thanks for sharing.
Warmly, Michelle
October 9, 2010 @ 3:51 am
Thank you so much for visiting me and leaving a comment! Love your project! What an awesome idea! Angie xo
October 9, 2010 @ 5:14 am
I LOVE this!!!
October 9, 2010 @ 6:59 am
Absolutely LOVE this idea! I'm going shopping tomorrow to find the materials to make something like this! Thanks for posting!
October 9, 2010 @ 12:57 pm
What a great idea to help us remember to be thankful for the life we have. Thanks for sharing!!
October 9, 2010 @ 2:03 pm
I am so doing this!! I love it, one of my favorite things you have created!!
October 10, 2010 @ 1:08 am
I just love this idea. I'm going to make one for my classroom. I teach grades 8-12 and for those who don't realize it…teenagers are the GREATEST, most caring people on earth! I can't wait to see what they put on my board. Bess in VA
October 10, 2010 @ 3:58 am
Beautiful idea…
October 12, 2010 @ 2:14 pm
Oh my heck…love, love, love this!Everyone on my Christmas list will be getting one of these!
October 12, 2010 @ 3:25 pm
Julie – This is precious! Love the blessings idea! Thanks so much for linking to The Sunday Showcase. I'll be featuring this today. Stop by and grab a featured button if you like. Hope you have a wonderful week. ~ Stephanie Lynn
October 12, 2010 @ 5:05 pm
Hi Julie!
I love this Blessing Board idea… lots! And I really enjoyed reading your 'About Me' page and your relationship with Jesus!
Sweet place you have here 🙂
Kindly, ldh
October 13, 2010 @ 2:45 am
So awesome….and so cute too. great reminder of the important things in life! I will definitely be bookmarking this to make soon!
October 13, 2010 @ 9:19 pm
I love this idea!! I have a small glass door from an old ikea bookshelf that i was going to toss- not anymore! I think I have all that stuff on hand- gonna go give it a try- thanks for the idea!!!!
October 14, 2010 @ 4:46 pm
Just made my own…love it! thanks for posting!
October 15, 2010 @ 6:54 am
So So true love the idea
October 15, 2010 @ 12:08 pm
I love this idea!!
I implemented at dinner at my house 3 positive things that happened that day, because I was getting so much negativety from my daughter and then-boyfriend! I said no matter how bad our day had been, we should be able to come up with 3 things each day that were positive. It really helped!!
But I love this idea too!! AND it's pretty! 😉
October 15, 2010 @ 12:45 pm
My dear friend was just diagnosed with cancer and her attitude is fantastic I've wanted to make her something all week and this is it, I will be at the thrift store when it opens today! Thank you, you made my day!
October 15, 2010 @ 1:22 pm
I couldn't agree with you more…we are all so fortunate. I have a spot right by my table that needs one of your boards. I'll be heading out to look for the perfect frame today.
Very inspiring!
I saw your feature at Tatertots and Jello.
Cheers!
Theresa
October 15, 2010 @ 1:26 pm
What a fabulous idea!
October 15, 2010 @ 2:03 pm
I saw this on Tatertots and Jello and had to come over an take a look. What a fabulous project. I think I'm going to need to make one for myself this week. So often we forget about all the good things we have been blessed with and focus on the negative. This is a great reminder.
-Margie
October 15, 2010 @ 4:13 pm
Thank you for sharing this idea and for reminding us to make counting our blessings a family activity. I had recently made a framed/wipe off chore chart using a similar method. It'll be fun to add this to our fall "decor". I can't wait to see what our 5 children come up with. ~ Debbie
October 15, 2010 @ 5:43 pm
This is a fabulous idea! Saw it on Tater Tots and Jello and am so glad to have found your blog! 🙂 I linked up to your tutorial today. Love, love, love it! 🙂
October 15, 2010 @ 6:19 pm
I love this! I want to make one. Thanks for the tutorial.
October 15, 2010 @ 7:32 pm
Hi, I saw your fabulous board on Fingerprints on the Fridge. Love it. Thanks for sharing the tutorial. I'm hoping to be able to put one together sometime soon.
October 16, 2010 @ 2:23 am
I want to make this!
http://www.cleverlyinspired.com
October 16, 2010 @ 2:47 am
Ah I LOVE this!! I want to make this!! 🙂 Come link up sometime to Handmade Tuesdays! It is a new linky I started with a tutorial 🙂 http://www.ladybug-blessings.com
October 16, 2010 @ 4:00 pm
love it!
October 18, 2010 @ 3:13 pm
Love it!
October 19, 2010 @ 4:32 am
Love it! Can't wait to make one!
October 20, 2010 @ 4:43 am
just wanted to say I really liked your idea and had to make one for myself. Here's mine if you'd like to see it.
http://always-in-wonder.blogspot.com/2010/10/counting-our-blessings.html
October 28, 2010 @ 2:43 pm
Julie ~
What a simple but intentional idea…one I may try to pull a group together to do toward Thanksgiving! Thanks for your creativity and blessing others with it.
Because of Him ~
October 31, 2010 @ 8:42 pm
This is a precious idea- love that you are involving your whole family in it, and the decor of the actual frame is gorgeous! Great job:)
November 2, 2010 @ 2:14 pm
Love it. The project and the thoughts behind it.
November 2, 2010 @ 2:22 pm
What a great idea. The memories it will create for your family as the tradition is created.
November 2, 2010 @ 4:23 pm
I love it! I saw this a few weeks ago and I made one. If you want to see what you helped inspire here's the link:
http://therealhousewivesofidaho.blogspot.com/2010/10/menu-and-blessings-boards.html
November 2, 2010 @ 10:51 pm
Wonderful idea – love it!
November 3, 2010 @ 12:50 am
This is so great…can't wait to make mine! Thanks for sharing!
November 3, 2010 @ 3:01 pm
Love this!! I hope you don't mind if I feature it today on my blog!
Thanks for sharing!
Tasha
http://www.dotdotdotthis@blogspot.com
November 3, 2010 @ 10:18 pm
Oh I love this project!!! Thank you for sharing the step by step directions on making this thanks!!! What a great way to remember to have an attitude of gratitude!!
November 4, 2010 @ 1:57 am
Very Cute! I love your gratitude theme! The idea of giving thanks on a board is just lovely.I stopped by from the CSI Project party! Hope you will pay me a visit too!
CC
http://currentlychic.com
November 4, 2010 @ 2:39 am
This is such a good idea and what a great way to keep the focus on the good things…I think I have a new project to do (;
November 4, 2010 @ 3:14 am
I adore this project!!! The word "blessings" is very dear to me.
I am going to book mark this!
Thanks for sharing. 🙂
Traci
November 4, 2010 @ 3:21 am
I love this idea…I see gifts for friends in the future (:
November 4, 2010 @ 3:31 am
Love that idea!! We talk a lot about gratitude in our home, so it would be nice to have it hanging on the wall!
November 11, 2010 @ 1:19 pm
Great idea…I love the simplicity of it and that you can change your blessings…keeps it relevant and personal! Definitely going to share the link on http://www.momcoloredglasses.com twitter page!!
November 12, 2010 @ 2:54 am
Such a wonderful idea, thanks for sharing.
November 24, 2010 @ 3:44 am
This is so gorgeous and a great idea!!
I just made a plaque with your quote, Count your blessings one by one, see what God has done!
My Mad World
December 1, 2010 @ 12:08 am
Hello again,
just stopping by to say I made on of these Blessing Boards and posted here: http://gratefulprayerthankfulheart.blogspot.com/2010/11/count-your-blessings.html
Thank you for sharing this lovely idea 🙂
Kindly, Lorraine
March 31, 2011 @ 1:53 am
Hi Julie!
I love this! I just posted about the menu board I made for $6 with this as my main inspiration. I had intended it to be a blessing board, but changed my mind because of the size of my frame. I plan on making a blessing board too when I find the right frame. Thanks so much for posting this! =)
You can see mine here if you'd like: http://supersavingsblog.blogspot.com/2011/03/before-and-after-menu-board-from.html
Mara @ Super Savings
July 14, 2011 @ 8:32 pm
Thank you for this DIY, it was very inspiring that I had to do one for myself.
July 23, 2011 @ 12:20 pm
Hello from Australia, Julie!
Thank you very very much for the wonderful idea. I have made my own version which you can see here:http://art-homewithkaren.blogspot.com/p/craft.html
You have inspired me so much and I wanted to say thank you for being so generous with your ideas.
God bless.
August 9, 2011 @ 11:27 pm
Thank you for this really beautiful inspiration! I found your link via Pinterest and couldn't wait to make my own!
Here's mine!
http://runninganniemm.blogspot.com/2011/08/crafty-fun.html
August 25, 2011 @ 1:49 pm
Thank You for posting this..found it through Pinterest :)…
Truly love the humbleness of your post as well, Love how kids can push us to be so much better…
http://ohthefunwewillhavebyus.blogspot.com
November 3, 2011 @ 4:33 am
Do you have a tutorial on the fabric/burlap flowers by any chance? Love, love this idea!!
November 24, 2011 @ 11:19 am
love it.. love your other posts too… you can check out my board too at http://nancyogengayouree.wordpress.com/2011/11/24/diy-wipe-off-menu-board/