Home Is Where Your Art Is
So here’s Part Two of of the story of my 90% off shopping spree at Hobby Lobby.
The night I found the first cartload of stuff I told you about Thursday, I had walked into the store about 20 minutes before closing time and happened across the clearance aisle, which was totally not enough time to shop a 90% off sale. After being warned over the loudspeaker to”Please make your final selections and make your way to the registers,” about 3 times, I knew I had two options: 1.) I could hide out, get locked in, and have all night to shop, or 2.) come back first thing the next morning.
I chose option 2. Mainly because I’m a scaredy-catanddidn’t have a flashlight for when the lights went out.
So, I went back the next morning just so I could get these:
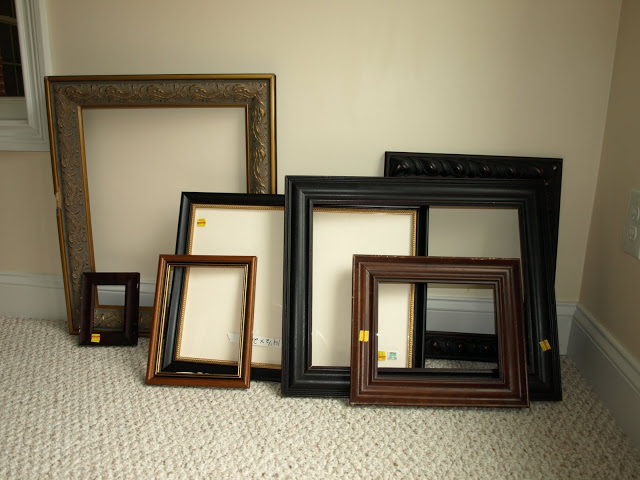
I’ve been waiting for a while now to find a good deal on a bunch of empty frames. And this was a great deal! It’s a growing trend to hang a group of empty frames on a wall, but I wanted some to use for a gallery wall for the masterpieces my kids are always creating. I even had the perfect wall picked out right by the kids’ craft table in our basement.
I got these 7 frames for right at $20, add in two bottles of craft paint for 99 cents each, and the project still costs about the same as a box of Pull-ups. These prices really were ridiculous.


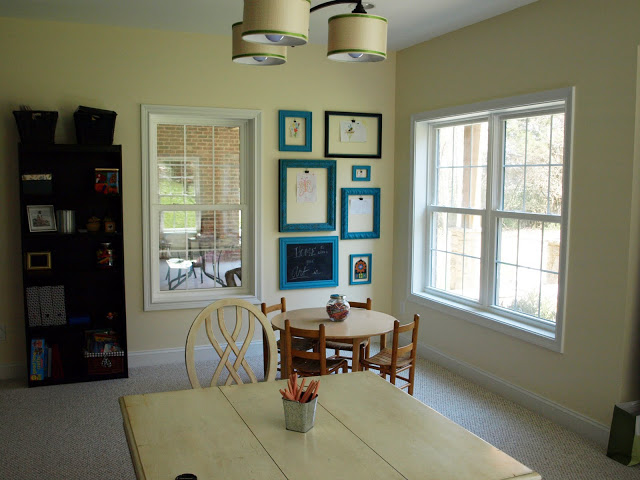
Update! We now have curtains. See the new treatments here.


March 22, 2010 @ 12:26 pm
This. Is. Fab. You did awesome.
March 22, 2010 @ 1:15 pm
Great idea. My daughter loves to draw and I can see her filling these up quickly!! Thanks for sharing!
March 22, 2010 @ 1:49 pm
Your wall looks great, I just did this myself 2 weeks ago, and love the look of empty frames, and super cool on the discount!
March 22, 2010 @ 2:03 pm
That is so cool!! And I just love displaying art work that my kids made. Beautifully done!
March 22, 2010 @ 2:04 pm
wow that is such a great idea! (i'm really into turquoise right now, too!)
i'll have to keep this in the back of my head for when i have kids down the road. 😉
March 22, 2010 @ 2:31 pm
This is really cute. You have some great ideas. I'm can't wait to see what else you share.
March 22, 2010 @ 2:38 pm
I love the color you picked. This is a great idea. Thanks for sharing.
March 22, 2010 @ 2:57 pm
I LOVE it! The turquoise just pops on the wall and with the black chalk board, wow! I really adore Hobby Lobby and their sales too! Thanks for the great ideas! Donna…the 3rd sister.
March 22, 2010 @ 3:09 pm
That color is perfect for spring. Great job and great find! Thanks for sharing with Made it Monday! Jules
March 22, 2010 @ 3:25 pm
Oh my goodness, I LOVE this! What a fantastic idea. Such an easy way to display your kids' art while looking great at the same time!
March 22, 2010 @ 4:38 pm
What a great idea and way to display kids' art while still looking chic! Looks fantastic, great job, girl!
-Ann Marie
March 22, 2010 @ 5:17 pm
Wow, what an amazing deal! And they turquoise looks so fun and beautiful! Great job. I am going to have to check out the Hobby Lobby clearance more often!
March 22, 2010 @ 5:35 pm
Ok, I love that you used the black clips inside the empty frame. I am doing this in Callie's room. Perfect for her wall. I have a ton of empty frames just sitting here dying to be used. I love it!
March 22, 2010 @ 6:00 pm
This is one project I could probably do without messing it up. I am always looking for ways to display art! I love it!
March 22, 2010 @ 6:02 pm
Wow!!! That looks great!
March 22, 2010 @ 6:45 pm
Love love love love love love love this idea. I'm moving this summer and I'm totally incorporating this into the design of one of my rooms!
March 22, 2010 @ 7:44 pm
Hi! Just found your blog from Pink and Polka Dot slipcover party. I love all the things you've done. I love the pop of color these frames added to the room, great job! See ya again soon 🙂
March 22, 2010 @ 11:49 pm
Great way to display your wee one's creations. One of my favorite quotes too btw.
Pamela
March 23, 2010 @ 1:40 am
absolutely Delightful!! …very well done! I will certainly give this a try. I hopped over from Skip to My Lou and I am so happy that I did! Please accept my invitation to drop in at my place one day this week when you get a moment. until later…
March 23, 2010 @ 4:30 am
love it
March 23, 2010 @ 4:33 am
it's nice to meet you:) your turquoise frames are so pretty and so practical, with the clips!
mary
March 23, 2010 @ 5:04 am
Just poppoing in from the Shabby Chic Cottage…love your blog, and LOVE this idea!
March 23, 2010 @ 6:41 am
What a great idea! Too cute! and those prices… unreal! 🙂
March 23, 2010 @ 12:14 pm
Never would have thought to paint them all the same color, but WOW what an impact. Totally draws your eye, which then allows you to see the wondermous art work! Bravo on an excellent project!
March 23, 2010 @ 12:58 pm
Oh my gosh this is so wonderful! I just love how you arranged them and what a fabulous deal on those frames!
March 23, 2010 @ 4:00 pm
That is super cute! I would love for you to join me over at a vision to remember for check me out saturdays
http://www.iamonly1woman.blogspot.com
March 23, 2010 @ 10:06 pm
What an absolutely fabulous find!! And what a wonderful way to put it all together…
March 23, 2010 @ 11:10 pm
Great idea. Love it! As soon as I read your previous post about HL and the 90%, I went the next day and found some things that I had looked at before. You can not beat those prices. This frame idea would work great in my guest bedroom. I have a long wall and this would look great there. Thanks for the idea!
March 24, 2010 @ 10:37 am
Julie,
Ooooh I love it. Looks awesome and what a great way to display the work of your artists!
hugs,
edie
March 24, 2010 @ 1:19 pm
OMG! I LOVE this! I think I might have to do this SOON!
~Bridgette
March 24, 2010 @ 3:02 pm
Wow this is great as well, I am sold!
March 24, 2010 @ 6:30 pm
Those frames look fantastic! Love that it highlights your kids art! Perfect.
Win Rachael Ray bake ware at my blog.
Thanks!
March 24, 2010 @ 8:15 pm
this is AMAZING and sooo creative!! Love it!
March 25, 2010 @ 12:18 pm
My husband is not going to like you when he comes home tomorrow and sees that I've painted my kitchen just so that I could have a set of frames that "pop" on wall!! I'll post them on my blog and link it back to you when I am finished. Many thanks for the great idea!! ALWAYS looking for an easy was to display the 4 kid's art!
March 25, 2010 @ 11:19 pm
I just found your blog via Cottage Instincts. I have an art wall like yours in my kitchen but my frames are black. Unfortunately, I didn't get such a great deal on my frames! I love the turquoise! I may repaint mine after we move!
March 29, 2010 @ 1:13 am
Love it-came over from Cottage Instincts. Man, you did get a great deal on those frames!
March 29, 2010 @ 3:29 pm
Love this! I don't have a Hobby Lobby near me! You may want to link this project to a party I have every Tuesday – Turquoise Tuesday at the Single Nester.
March 31, 2010 @ 7:48 pm
Thank you so much for sharing your project on Turquoise Tuesdays. I have to get me some Desert Turquoise!
April 1, 2010 @ 9:55 am
This is so BEAUTIFUL! I absolutely adore what you've done. So much that I know I am going to have to try it myself!
April 19, 2010 @ 3:41 pm
This is so cute, love the bright color to liven the space up! I may have to work up the courage for that!
June 22, 2010 @ 2:10 pm
What a great idea! It looks beautiful!
June 22, 2010 @ 2:52 pm
I love this! What a fabulous idea. I am definitely going to have to try this as soon as my daughter is old enough to start creating!
June 22, 2010 @ 2:57 pm
Love this idea! and your color choice is totally fabulous!
June 22, 2010 @ 3:09 pm
I love it! It's a great pop of color in that corner and I like that one of the frames holds a chalkboard.
I also shared a child's wall art project at CSI, but now I'm thinking I need to add a chalkboard in there too!
June 22, 2010 @ 3:48 pm
I love this idea. I just may steal it when I create a playroom for my daughter!
June 22, 2010 @ 5:01 pm
Great idea! I love the color you chose.
June 22, 2010 @ 5:31 pm
That is seriously the best idea yet for displaying kids art. My magnet board is great but the magnets fall off a lot. I am so happy you shared this project on CSI. If only I could find a good deal on new frames too 🙂
-Desiree
June 22, 2010 @ 6:20 pm
That is such a cute and creative way to show off artwork! ADORABLE! And I bet your kids love to change it out whenever they want with their new masterpiece.
Visiting from csi.
June 22, 2010 @ 6:57 pm
fabulous! i love it! wish we had craft stores that had great bargans like that, and btw, if you find the 90% off drapery let me know where i can get some too!
June 22, 2010 @ 6:58 pm
fabulous! i just love it! wish we had craft stores that had amazing bargains like that. and btw if you find that 90% off drapery, let me know! 😉
June 22, 2010 @ 7:17 pm
Hi! I am visiting from CSI, and I must say these are too cute! I love the blue, and I love that you hung your kids artwork in them! I have a toddler, so you have definitely inspired me! Great job!
June 22, 2010 @ 7:19 pm
I'm so glad you shared this project! I've been trying to think of a good way to cut down on the refrigerator door clutter, and have a cute way to display my children's creations, at the same time. This is the perfect solution! Now, how in the world did you come across that 90% off sale?
June 23, 2010 @ 2:07 am
Great idea. I love the color. And the price can't be beat! Found you through the CSI project.
June 23, 2010 @ 5:32 pm
So awesome. I can't believe they were that cheap! I love the color you picked!
June 24, 2010 @ 12:18 am
Phew, 90% off? Be still my heart 🙂 LOVE the teal, I did a wall of teal frames too! The little binder clips are great!
June 24, 2010 @ 1:03 am
This makes me laugh my head off because the project I submitted to CSI involves a little Hobby Lobby find @ 80% off. What the heck? I didn't know it would go to 90%!! (tee hee)
I adore everything about this, the display, the teal, the chalkboard. It's the first one I clicked on over there. And I'm SOOO not dissappointed. Great Job!
June 24, 2010 @ 4:34 am
i love it! the whole wall looks so cute!
June 24, 2010 @ 1:19 pm
That is gorgeous! What a fabulous idea!!! I sooo need to do that myself! What a great find on those frames!!!
June 24, 2010 @ 3:46 pm
I am trying really, really hard to not hate you. For not only having a Hobby Lobby, but for getting all of these rad frames for cheap. Then you went and painted them my fave color. So the not hating? It's super hard. I'm working on it though. Brilliantly done. Brilliant.
June 24, 2010 @ 6:41 pm
Wow, what a great idea! i've seen the empty frames a ton, but i love your idea to use them as an art gallery. With 3 littles making TONS of crafts, i'm always trying to think of ways to display their art in a pretty way. thanks! 🙂
June 24, 2010 @ 7:16 pm
This idea has made my heart go pitter pat! I have been trying like crazy to think of a way to display my kiddos' creations. This is it! Thank you!
October 21, 2010 @ 4:48 am
Love love love these frames! Your entire site is gorgeous-I just stumbled upon it thanks to Linky Link 🙂 I am now following your blog!
April 25, 2011 @ 1:17 am
You are a genius. Obviously. And you don't even need my comment, since you have so many already. But here it is anyway. That is amazing.
July 14, 2011 @ 3:39 pm
I simply ADORE this!! So beautiful and perfect. I want to do this…Now to see if I can find frames for cheap. I am going to start looking!
July 18, 2011 @ 11:00 am
What is your wall paint color?
July 18, 2011 @ 12:50 pm
@shepherdsgrace
That's Morning Sun by Sherwin Williams
July 30, 2011 @ 3:24 am
Such a wonderful idea! I found your photo on Pinterest and it's going to be my inspiration for the "Pinterest challenge" Emily Henderson blogged about it here: http://www.stylebyemilyhenderson.com/blog/did-i-hear-something-about-a-design-challenge.html
Lovely lovely idea!
Krishann
August 3, 2011 @ 3:24 pm
I love this!
September 20, 2011 @ 2:15 pm
Love this idea!
Georgia
🙂
September 20, 2011 @ 9:31 pm
Found you on pinterest and was inspired! I linked to you in my blog post – hope that's ok!
September 21, 2011 @ 10:07 pm
Great idea, I am going to do this. I love your color of choice too – dessert torquise. I may just go with that color! 🙂
September 28, 2011 @ 7:10 pm
I love this idea..it's exactly what I want to do for all the art my kids make!!
And gotta love a 90%off sale!
October 17, 2011 @ 7:16 pm
I found you via Ohdeedoh. Great idea, and great bargin hunting!
October 31, 2011 @ 8:23 pm
I LOVE this, and am 90% done with doing this in my own dining room based on your idea! I found some clearance frames, repurposed some old frames, painted them the color of my living room to contrast/complement the dining room (you can see one room from the other) and instead of a chalkboard I am doing a linen covered bulletin board. I also added a shallow wall shelf that has been floating around our house looking for a home. Instead of binder clips I used mini-clothes pins painted to match the frames. I can't wait to hang everything later today!
October 31, 2011 @ 10:59 pm
@heintzhouse
Fantastic! I'd love for you to email a pic when it's finished!
November 4, 2011 @ 3:37 pm
I love this so much, and featured it in my blog post today (with a link back to you, of course!)
Jenny
http://www.simcoestreet.blogspot.com
November 30, 2011 @ 3:07 am
This is awesome! You could also put cork board in one (or several) to make small bulletin boards to tack up artwork. Thanks for sharing!
Crystal
http://www.SoooBig.com
December 10, 2011 @ 8:29 pm
Thanks for sharing. I have done this as well in my home.
December 11, 2011 @ 3:40 am
I absolutely love this idea – fantastic!
January 26, 2012 @ 11:31 pm
Found you through Pinterest. Great deal… 90% off! Incredible.
February 5, 2012 @ 4:55 pm
This idea is beyond fantastic. I found this on Pinterest and have now bookmarked your blog. Great ideas. I am already looking for cheap frames to get this project started. Thanks!!!
February 9, 2012 @ 6:21 pm
I love this!!! Thanks for the great idea!
March 11, 2012 @ 1:15 am
I've got my frames all ready to paint but wondered, did you not sand or prime them before paining them? I'd love to skip that step but dont want to if its important. I dont have much experience with painting. Thanks!!
March 11, 2012 @ 1:54 am
No, I didn't sand or prime these. Since they are a somewhat distressed look anyway, I wasn't concerned with chipping. Also, they will not get a lot of "wear" since they are just hanging on the wall. I'd love to see yours when they're finished!
March 11, 2012 @ 3:12 am
Thanks for the quick response Julie. And yes, I will send you a pic once its complete. Thanks again for the inspiration!
June 2, 2012 @ 12:51 pm
Julie, How did you adhere the black clips to the wall?
– julie 🙂
January 14, 2013 @ 6:25 am
I just love this! Thanks for sharing it, I pinned it. 🙂