Vintage Mailbag Pillow
So, I’ve got a fun pillow project for you today that’s easy enough for even the most beginning beginners.
I made this pillow to look like it was made from a vintage mailbag, but you can actually take this idea and run wherever your creativity leads you.

It’s made of canvas drop cloth, which I know comes as a big surprise to those of you who follow me often. And I also used another of my favorites– freezer paper stenciling, which you can read all about here.
The mailbag part of the pillow is actually more like a “sleeve” that I made to fit over a basic down pillow, covered in blue and white ticking stripe.

To make the “sleeve”, measure your pillow across the front from seam to seam. Then, cut two pieces of canvas the same width as the width of the pillow, but one inch longer than the length from top to bottom. For example, my pillow measured 24″W x 14″L , so I cut my two pieces of canvas at 24″ wide x 15″ long.
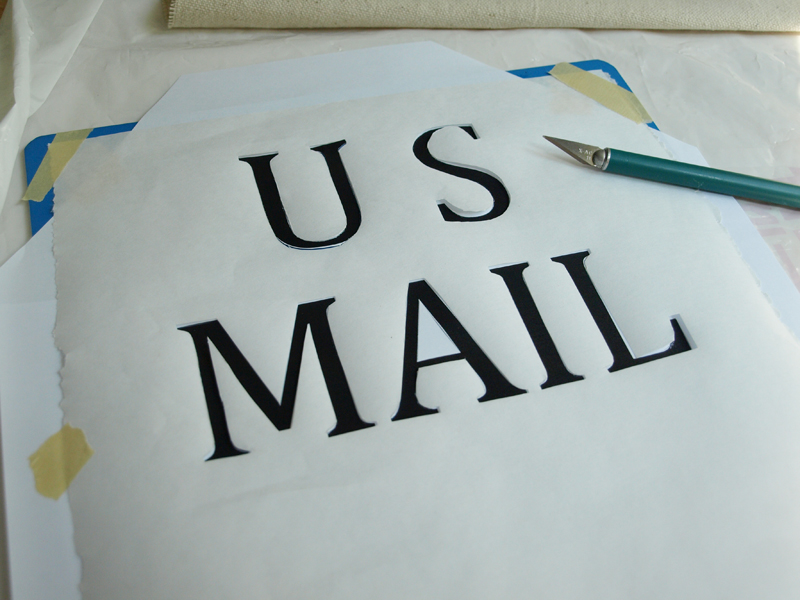
Next, paint your design motif onto one piece of the canvas using the freezer paper method or other stencil.

I also added a couple of stripes to mine by cutting some strips of freezer paper with a paper cutter, then ironing, and painting.


Once the paint is completely dry, sew the two pieces of canvas together at the tops and bottoms with a half-inch seam allowance {this means line the needle up to sew 1/2 inch from the edges of the fabric}, leaving the side edges open, creating the sleeve.

To finish the sides, fold and press the raw edges about 3/4″ under and then fold and press again another 3/4″.

Then, sew over the folded edge to create a clean finished side to the sleeve.


To make tie closures, cut 8 lengths of jute or thick twine, approximately 15″ long, and sew 4 on each end of the sleeve, lining them up so they can be tied together.

Once that’s done, the sleeve should fit snugly over the pillow and tie, allowing the sides of the ticking to show through slightly on each end.


It’s a fun look that I hope you like. This one’s going in the guest room that’s coming along a little more each week. Can’t wait to show that to you soon!
I’ll be sharing this with a few of these friends.

Related Posts


July 24, 2012 @ 1:12 pm
Darling pillow project! I've never thought of letting the ticking peek out the ends- love it!
July 24, 2012 @ 1:23 pm
Love this! You're so creative!
July 24, 2012 @ 2:34 pm
Oh, lovely! I also love the idea of letting the pillow peek out the ends. Wouldn't have thought of that…is this fabric hard to clean?
July 24, 2012 @ 4:58 pm
This is such a cute pillow. I'd love to make this for my mom! Can't wait to see the room!
July 24, 2012 @ 7:52 pm
love your pillow, i would love to feature it , let me know if this is ok with you,
lauren
July 25, 2012 @ 3:08 am
That is really, really cute, Julie- and what a great tutorial. Blessings-xo diana
July 25, 2012 @ 6:43 am
Great idea!
July 26, 2012 @ 9:56 pm
What a cool pillow! Thanks for the great tutorial. I really need to try this myself. I'm your newest follower.
July 26, 2012 @ 11:11 pm
Hi Julie,
I just found your blog through French Country Cottage and I just love it.
I really like how you made the pillow, you did a wonderful job!
Hope you have a lovely night.
Sincerely,
Melinda
July 26, 2012 @ 11:18 pm
Darling project, don't you love drop cloth fabric?
Karee
July 27, 2012 @ 12:59 am
Such a great pillow! I love it.
Nice visiting with you tonight.
July 27, 2012 @ 2:15 am
Oh so cute! I am on a real pillow kick lately! I love how you tied up the ends.
August 1, 2012 @ 1:26 pm
LOVE this! Hope you can link them up at my trendy tuesday party going on right now!! http://www.sweetlittlegals.com/2012/07/trendy-tuesday-10.html
August 1, 2012 @ 8:01 pm
This is adorable!