Master Bedroom DIY Details and Sources
Thank you all so much for the nice comments and messages about my new Master Bedroom. If you missed the reveal yesterday, click here to see all the pics. So many of you share my taste in decorating and DIY that I couldn’t wait to show you!
Some of you took some guesses as to what was DIY’d and what came straight from the store, and you might be surprised at some of the answers! So here’s the scoop…
The bedding (probably my favorite part of the room):

If you said DIY’d, then you’d be mostly right!
The duvet and shams are actually my original set from Pottery Barn. Mine is a few years old, but they still sell this set here online.

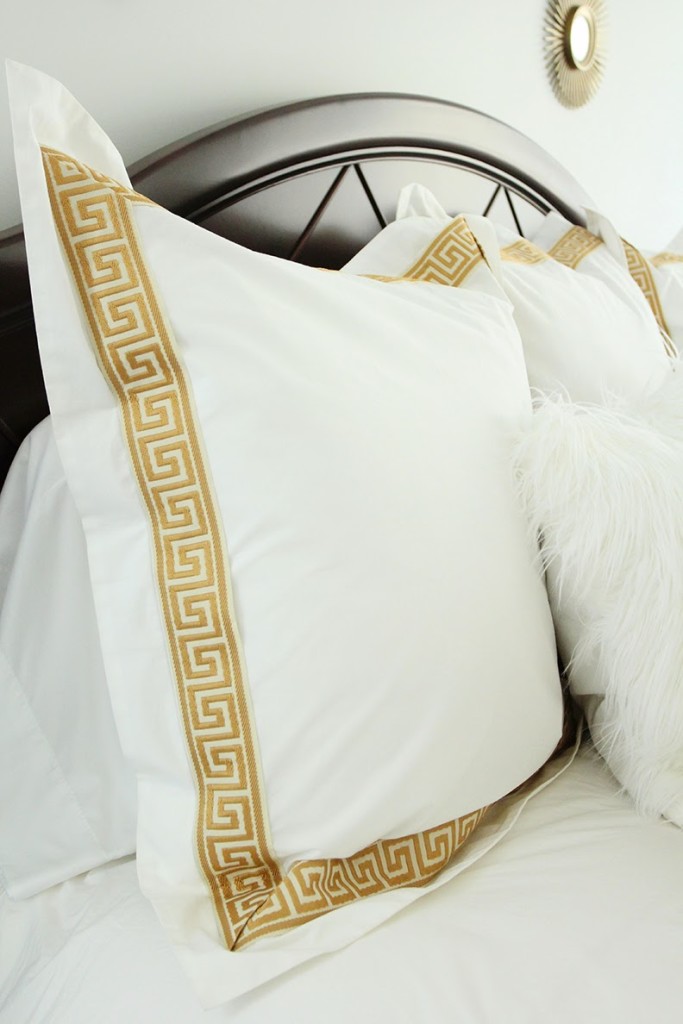
My inspiration set was this one from Serena and Lily, but since mine was still in great shape, I decided to just make it over with some ribbon and trim from Hobby Lobby! And there was no sewing involved since I chose to use Heat N Bond hem tape to apply the ribbon.
I literally ironed it on while it was still on the bed so I could get the ribbon lined up properly. I just placed a towel underneath to protect the mattress, and ironed well all the way around.


And since I gotthe ribbon on a sale week, theduvet makeover was a whopping $4. Love!

And for the shams, I used the same technique with this gold Greek key trim, also from Hobby Lobby! This trim was a bit of a splurge, but I think the way it turned out made it totally worth it.
I also made the fur pillows which might possibly be my favorite. I highly recommend this Mongolian Fur if you are looking for some dreamy white pillows. It is excellent quality, very white, very fluffy, and super-soft. I used my easy zippered pillow cover methodwith plain white cotton for the pillow back and the fur on the front. One yard of the fur made two 18-inch pillows with plenty of fabric left over for whatever else I find out I need this for. These pillows can cost up to $200 so I think I got a great deal!
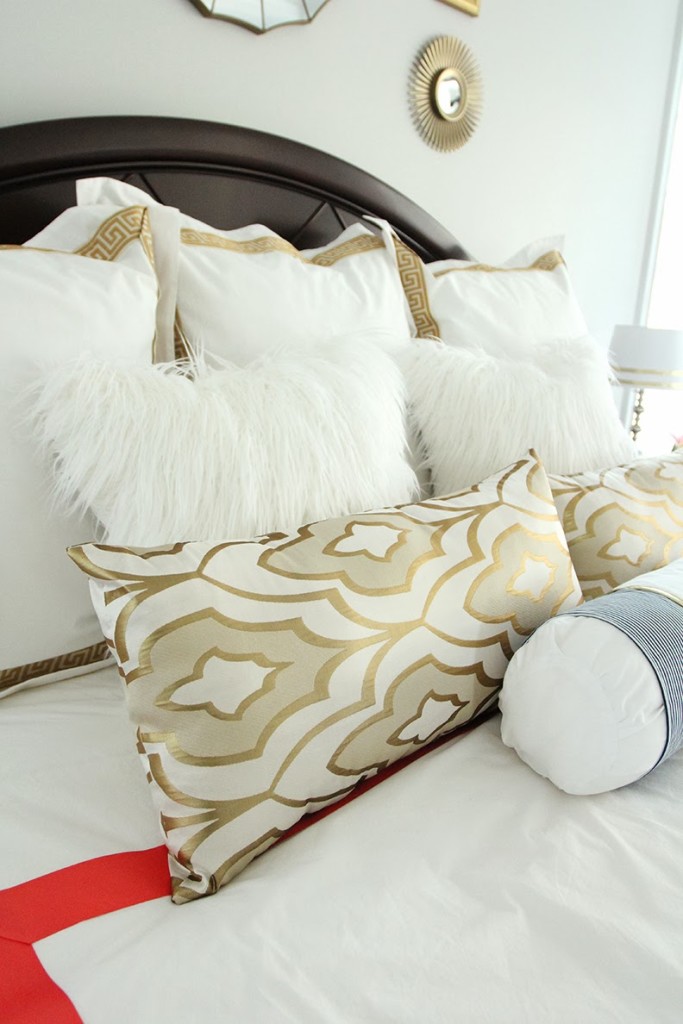
The metallic gold pillows were a steal I found at Home Goods, so no sewing there, but I did make the bolster by salvaging my original Pottery Barn monogrammed pillow along with some navy and white striped fabric and a little gold trim.

And the floral duvet on the end of the bed was a clearance find from World Market that my best friend talked me into which turned out to be the icing on the cake.

And now that I’ve written a book about the bedding, we’ll move onto my other favorite in the room: the campaign desk.

Did you think I bought it new? Well, you’re right. But, I also gave it a makeover! Maybe you’ve seen this desk at your favorite Target…

Well, I knew I wanted a glossy white desk for the room, but I didn’t want to pay the steep prices that came along with them. So, I opted for this one from Target which I bought on sale and with a Cartwheel coupon for around $115. And with a little Zinsser Primer to save me from sanding, and some Extra White Pro Classic Enamel from Sherwin Williams, I had my white desk.


And a couple quick coats of my favorite Krylon Metallic Gold glammed up the hardware as well.

I paired the desk with a classic lucite chair from Home Goods (found out later that I could’ve gotten a better deal here) and I made a small leopard pillow with fabric from, you guessed it, Hobby Lobby.

And I am totally loving it as I type to you right now from this very spot. Oh, and that rug? No, I didn’t dare try to DIY that one. Found it at Marshall’s and it was just what this space needed.
More purchased pillows were the ones on my big chair. They came from Home Goods and Ross, and after a lot of searching, I finally found the coral throw at a local store called Steinmart.

The curtains, as I mentioned in the planning stages of the room, are these MARMORBLAD panels from IKEA, engineered slightly with the addition of some basic navy broadcloth from Hobby Lobby to get them to the correct length. And I think the price has to set some kind of record since they were (are you ready for this?) LESS THAN $10 EACH for these 108″ panels! Have you ever!? And I think they just make the room. Love them. Thank you, IKEA.

Moving on, the chevron Ikat rug under the bed is another of my faves and I bought it here at Overstock with a coupon code and Ebates for an even better deal. If you have not yet signed up for Ebates, click here now! It will save you tons on most online purchases and give you any available coupon codes to use as well! This rug worked wonders to soften up this room.
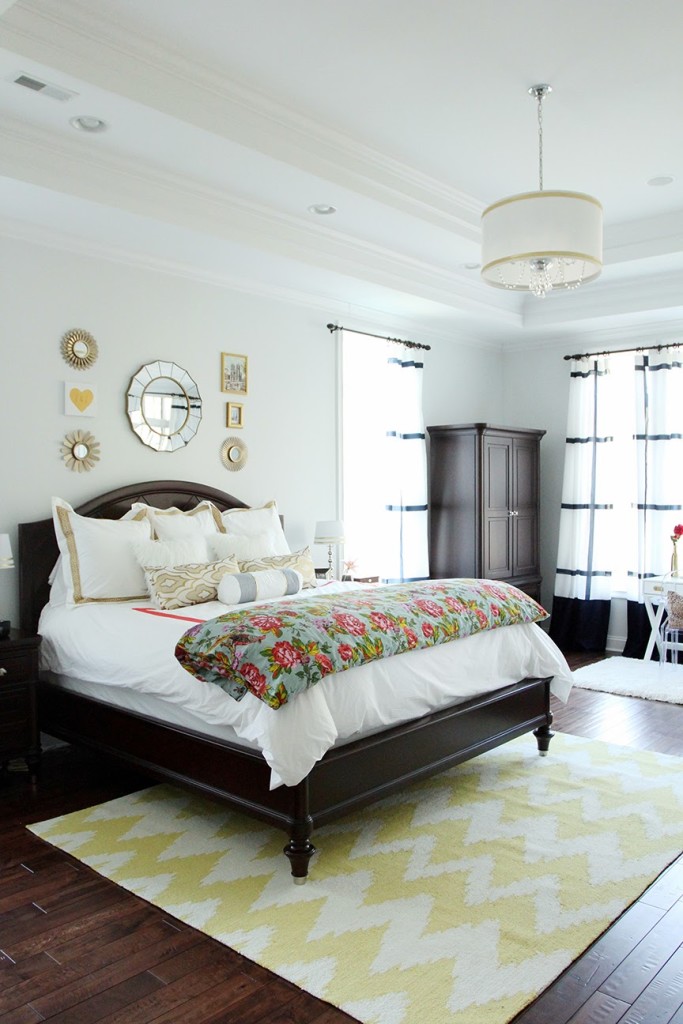
Are you still with me? Here are the details on the gallery wall–all the mirrors came from Target and the 2 Paris paintings were some I already had, so the only DIY project here was the gold heart canvas, which I told you about here, in case you missed it.

And the last piece of wall art was my Gold Duck Tape Art from last spring which I converted to a large photo frame just by adding a $2 photo mat from Hobby Lobby. Click here to see that original tutorial.


And if you missed the tutorials on the lamps, you can click here for the details on those.
Oh my goodness! Did I cover everything? Let me know if I didn’t and I’ll try to fill you in.
Again, thanks so much for stopping by for a visit to my new room. I love sharing fun projects with you all and I’m so glad to have each of you here!
Sharing this post atMiss Mustard Seed’s Furniture Feature Friday!


March 4, 2014 @ 4:29 pm
Just gorgeous!! I love all of the details. I was just thinking about adding trim to my white duvet or shams. So glad I found your blog this morning! (Pinterest)
March 4, 2014 @ 5:37 pm
Great, Kathy! Glad to have you here 🙂
March 4, 2014 @ 6:03 pm
Looks beautiful!!!!
March 4, 2014 @ 8:38 pm
Thank you, Leslie!
March 4, 2014 @ 9:37 pm
LOVE IT! I've been eyeing this desk for a while now at Target and just don't have anywhere to put it. FYI – that SW paint – it is self leveling so no sanding….. with the red I prob would still prime but we just painted our kitchen cabinets with the SW Pro Clasic paint and let me tell you – no brush stokes! NO SANDING between coats… it was a beautiful thing. Your room looks great! Thanks for sharing it. Victoria
March 5, 2014 @ 11:59 am
Yes, I love the Pro Classic! So glad you like the room. Thanks for stopping by!
March 5, 2014 @ 10:54 am
Love all the details. Your room looks beautiful. Where do you buy the Mongolian fur, please?
March 5, 2014 @ 11:57 am
Hi, Debbie! This is the one I used: http://www.amazon.com/dp/B009B0LNJC?tag=lesthaperlifo-20
It's wonderful!
March 5, 2014 @ 1:40 pm
It's beautiful! Is the wall color still the same? Nebulous White, I think?
March 5, 2014 @ 7:31 pm
Yes, same color! Thank you!
March 7, 2014 @ 2:26 pm
Love your bedroom. It is so light and fresh. My goodness what a difference some ribbon makes on your bedding and especially the Greek key on the pillows!
March 9, 2014 @ 1:33 am
So glad you like it! I love light & airy 🙂
June 20, 2014 @ 5:04 pm
Love the Desk DIY. I bought a white one just like it from Target on sale already, but got inspired to paint the bedside table white. Your post gave me courage and it turned out pretty well with the same exact paints and it wasn't too much work. I do have a question about painting though. When I was applying the 2nd coat of paint 6 hours after the first (can says to wait 4 hours), the paint seemed to "pull" up towards the foam roller and didn't look as smooth as the 1st coat. The 1st coat finished smoother than the 2nd. Any ideas? This is my first time and I'd like to do the dresser as well. Can you advise? Detail: I used foam brush for details and foam roller for the rest. Maybe that's my mistake?
June 20, 2014 @ 5:39 pm
Hmmm– I'm not positive what the issue could be. Was it hot or humid where you were painting? Sometimes the paint can get gummy if the temp is too hot and that could be it. Or it could have something to do with the foam. I normally use brushes for my furniture, so I'm not familiar with how a foam brush or roller reacts. If you don't like the finish, you can always wait until it's dry, then sand it lightly to smooth it, then apply another coat. Hope that helps!
August 3, 2014 @ 7:22 pm
Hi Julie, I love what you have done with your bedroom! I especially love the white desk! I have been searching for a glass white campaign desk, but they are so pricey. I found the campaign desk at target, only three colors black red and woodgrain. The black and red are both $149, the woodgrain is on sale $134. I'm wondering if I could buy the woodgrain desk and painted high-gloss white and not see the woodgrain through it? Any ideas or suggestions? Does your desk show any grain??
Thanks so much!!
August 3, 2014 @ 7:43 pm
Sherri–Mine is still holding up perfectly. The secret to not letting that wood grain show thru is the primer. So, if you give it a couple coats of the Bulls Eye primer, you should be good! Hope you have fun with it! Definitely a better deal than the ones I've seen, too!
August 18, 2014 @ 2:56 am
I love your master bedroom. I was on pinterest looking for a desk for my new home office and came across your white desk, which brought me to your blog…I love the curtains and everything you did to make your room look luxurious…Perfection… Thanks!
August 18, 2014 @ 11:41 am
Thank you! So glad you like it 🙂
January 8, 2016 @ 1:36 pm
Love this post! I had been searching for a nice, sleek, white desk with a bit of storage space. I found great white desks, but with no good drawer space. So, I went ahead and got the salsa red desk and the listed products and painted it! It came out well, I'm pleased. The hardest part was getting the drawer handles gold (I didn't have any blue tape), but I made it work. Thanks so much for sharing.
January 8, 2016 @ 5:40 pm
Great!!! I'd love to see yours in your space!