Faux Parisian Grain Sack Meets Faux Roman Shade: A Real Love Story
I’ve been doing a little primping in the bathroom this week. Unlike my normal primping in the bathroom, this was actually done to the bathroom, not to myself. Ok, so whatever. I made the decision a while back to make a faux Roman shade for my bathroom window. And since I gravitate toward all things Paris, I combined the idea with inspiration from a Paris grain sack & that’s how this treatment was born… Class, can anyone guess what kind of fabric I used? Of course. A canvas drop cloth. This one was a 7 oz. weight & I used about half of a 9’x12′, so it cost me around $10. And yes, I buy so much of this stuff the people at HD & Lowes don’t even look at me funny anymore.So, I started out by assessing the window, & deciding on the area I wanted the treatment to cover. I wanted my “shade” to hang over the outside of the window & trim, but this could also be made to fit inside the window casing as well.
 Then, I was ready to transfer the design to the top piece of canvas.You know I wouldn’t lie to you– this took a little longer than I first anticipated. I had totally planned to go with this method for the design transfer. However, after several failed tests with different products, I just could not get it to work for me. (By the way, if anyone has a tip for me on this, let me know. I still love the idea of it.)SO, I had to go with Plan B to get my design transferred to the fabric, which was the freezer paper stencil. (Yes, I’ve gotten a lot of experience with this lately. Click here to see more.) This was, by far, the most complex design I’ve done & yes, it was tedious, tiring, & all that good stuff. Re-assembling the inner parts of the letters was a challenge. But, I got it done & I’m happy with the results.


 After the design was on, the rest was easy. (Yes- you, too, can do this!) I simply sewed the two pieces of canvas together, leaving the top open, then turned it inside out, creating a huge “sack”.
 At this point, I ironed out the wrinkles & hung it over my ironing board to finish off the bottom.To get the look of a shade that’s partly drawn up, I measured up from the bottom the extra 11 inches I had added & marked it with a pin.
 Then, I created a few folds up to the pin & sewed the folds together with a needle & thread.


 After I repeated the process on the other side, I realized I had some excess droop-age in the middle & since nobody wants that, I did a little tweaking & added a couple more stitches there as well.
 After the sewing was done, it was ready to hang, so I asked my handsome assistant to cut my chosen piece of wood to exactly one inch shorter than the width of my “shade”. I did this to make sure the wood would not peek out one side or the other. The wood we used was a piece approximately 2 1/2″ wide & 3/4″ thick, but any size similar to that will work. (I’ve even done this with a yard stick.)
 I attached the fabric shade to the wood by placing my shade face down & wrapping the top edge of the fabric around the wood; then I used a staple gun to secure it in place.

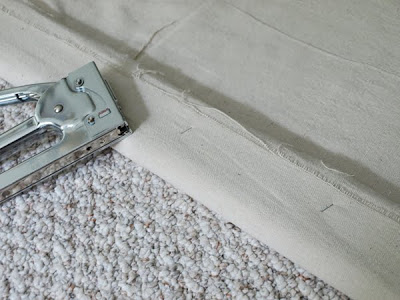 I also added a staple on each end, wrapping the fabric around the back of the end of the wood to cover it. (Wow, I’ve made this sound way more complicated than it actually is!)
 After that, it was ready to go up. My hubby drilled a couple of pilot holes into the wood for me to prepare the way for screws, but we found out it would be better to drill the holes before attaching the fabric so it doesn’t pop out your staples so you don’t have to go get your staple gun & do it all over again. Just sayin’.
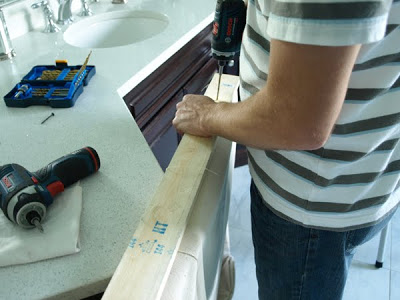 To get it on the wall, he just drilled the screws into the pilot holes & that was it! No drapery hardware required.
 Easy, huh? I know –this post made this project sound way harder than it actually is & I’m exhausted typing it out & if anyone is still here, I know you’re exhausted reading it. So give yourself a break, come back soon, & I’ll show you more of the bathroom & how my new shade looks in there. Whew! I think I’ll go soak in the tub.Stop by some of these sites where I’ll be sharing this little how-to.
Related Posts


September 22, 2011 @ 9:38 pm
I love it Julie! A perfect treatment for any window that doesn't need privacy or has a shade underneath that hides up under that. Great stencil, too!
September 22, 2011 @ 10:43 pm
Very cool Julie and nice thinking! xo
September 22, 2011 @ 10:58 pm
Wow Julie, that looks really great! I love drop cloths and have been using them for some time now. In fact, I'm working on a project right now that is getting the drop cloth treatment!
Judy
September 23, 2011 @ 12:12 am
Julie- It is beautiful. I love it. It is amazing how much more words you have to expend to tell how to actally DO something, isn't it? The doing is easier than the telling sometimes! xo Diana
September 23, 2011 @ 12:31 am
Julie, that looks so pretty! I love the Paris theme. I have done one of these valences and you are right it does go pretty quick. Great job.
September 23, 2011 @ 1:49 am
I love this! I love what you painted on the shade as well. I am going to have to go and get some of the drop cloth stuff I keep seeing. Awesome idea and soooo up my alley.
~Shanon
September 23, 2011 @ 2:23 am
So beautiful! Nicely done!
September 23, 2011 @ 4:10 am
Wow, this is amazing!
September 23, 2011 @ 7:00 am
I can just see you lying in bed, in the middle of the night, thinking of how you're going to create all of these things! Of course, you do everything to perfection, always making me laugh! Love the results too!
September 23, 2011 @ 12:04 pm
I just LOVE this! Your window treatment is amazing! Thanks for the very detailed pictures, too. I plan on giving this a try (and pinned it so I won't forget).
Visiting from The Shabby Nest. Following you now. 🙂
September 23, 2011 @ 1:36 pm
Looks fabulous!! Thanx for the tutorial!
September 23, 2011 @ 2:16 pm
Seriously Wonderful. Excellent project.
Your tutorial ROCKS! Hat's off to a great post!
xo Jeanne.
http://www.beeskneesbungalow.com/
September 23, 2011 @ 8:01 pm
So cute and professional looking! I'm using drop cloths a lot lately and love that they are so versatile. All of your projects are so creative and well thought out.
I linked to Lola's curtains in my post from a few days ago. Hope you'll check it out!
Jennifer
September 23, 2011 @ 11:22 pm
Great shade! Thanks for the tutorial!
September 24, 2011 @ 12:12 am
WOW! That turned out great!!
September 24, 2011 @ 1:22 am
I love this – it turned out great!
September 24, 2011 @ 1:49 am
I love this! I'm all about anything faux when it comes to windows treatments, and I love how this turned out! Very clever and well done!
September 24, 2011 @ 2:37 am
This is so pretty!
September 24, 2011 @ 2:48 am
Beeeeautiful, Julie!!!! Great job! Thanks for the wonderful tutorial, too! 🙂
xoxo laurie
September 24, 2011 @ 3:10 am
Your "faux" shade really turned out nicely! You did such a nice job!
I would be delighted for you to link up to Potpourri Friday & a Giveaway (in progress)!
September 24, 2011 @ 4:13 am
I can't even begin to tell you how much I LOVE this! My friend is redoing her daughters bedroom with a Paris theme…I will be sure to pass this on to her.
September 24, 2011 @ 5:20 am
You did it! I have been looking for an easy curtain for windows that don't have privacy issues, I wanted roman shades but didn't want all the fuss of cords, and dowels, and you have the perfect shade. I'm so glad I came across your blog via FunkyJunk Interiors. Thanks for sharing! ( and I can't wait to come back and read more of your posts)
September 24, 2011 @ 11:02 am
You have done the most amazing job! Your curtain looks so fantastic! You are very inspiring! X
September 25, 2011 @ 4:33 am
Love your darling shade- so charming!! Sharing this on FB ~ thanks for sharing at Feathered Nest Friday!
September 25, 2011 @ 7:49 am
Hey–your shade looks great. I've done some stuff like this and do have a few tips. First of all, they sell kits with string and pulley so you can raise and lower the shade–a string is fed thru some rings and attaches to the window at some hooks. Not at all hard to do. (Joann's) Secondly, you can staple to the wood and just use a seam ripper to make a teeny hole in the fabric, then the drill bit won't get caught and wound all around for smooth drilling. Finally, I've used a sort of print on the computer transfer paper (they have it at Joann's) to print a photo and then iron onto fabric. It came out well. I bet an image like yours would come out even better. In any case I think you did a great job, love your shade and the color and moulding in your bath are beautiful.
September 25, 2011 @ 12:14 pm
Hi… I love your blog! You did a fabulous job on your window treatment! I too love anything and everything Paris.I have not stenciled much, but I'm considering stenciling the walls in my daughters' bathroom. I have been looking online for patterns…XoXo
September 25, 2011 @ 5:29 pm
I saw you over at Designer Garden. I love what you did with this shade! I have a small window in the kitchen where something like this would be perfect. Thanks for inspiring me with your talent…
October 1, 2011 @ 3:58 am
Super fun and how easy you make them look! They are simply beautiful!! 😉