Not Your Typical Topiary
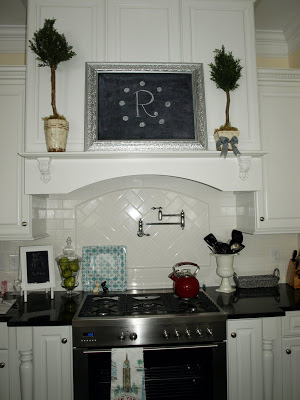
 Hope you had a great Valentine’s Day with the ones you love. We did here. But, now that it’s over, I’m ready to move on to the next thing. All my Valentine décor was down before I even finished my coffee this morning & now I’m back to decorating for the everyday. For now. For months now, my little shelf above my range has been bugging me to give it something to call its own. I gave it a chalkboard just before the Christmas season, but that wasn’t quite enough. It wanted topiaries. I found some from Ballard Designs, but they were a little pricey & I didn’t love them enough to have them standing over my head every day. So, I finally took a blind trip to my beloved Hobby Lobby, hoping to find inspiration amongst the 50% off green plastic foliage. I left with some little boxwood bushes & hoped everything would turn out okay. When I got home, I pulled out some little glazed ceramic planters I had been saving for this occasion & then took a walk in my backyard, searching for the perfect sticks. Once I found those, it hit me! And my little topiaries came to be.Here’s what I used:
- my green bushes (I only ended up needing about one & a half of these)
- my wire cutters
- my husband’s drill with a 1/16th of an inch bit (this was the fun part)
- my 2 perfect sticks ( a little over an inch in diameter)
- my hot glue gun
- some newspapers
- & some moss

 And here’s what I did: 1.) With my wire cutters, I cut the stems from the bushes, just like I did with my green wreath project.2.) I then took the drill & carefully drilled holes at a downward angle around the top of the stick.


February 16, 2010 @ 2:23 am
Love it! The rub-on letters were genius! So cute.
February 16, 2010 @ 12:27 pm
Brilliant! Beautiful! I NEVER could have come up with the 'know-how'!!!
February 16, 2010 @ 2:42 pm
OK seriously clever and crafty gal!! Love it and it looks better than my Ballard.
February 16, 2010 @ 5:27 pm
Loving those — the rub ons are brilliant!
February 17, 2010 @ 2:52 am
I love them!! You did a great job!! Thanks for sharing!!
February 17, 2010 @ 8:26 am
Love these! Great job – Thanks for the inspiration and sharing!
February 19, 2010 @ 1:55 am
I love your topiaries!! I have been on a topiary making kick lately. 🙂
February 19, 2010 @ 3:54 am
amazing! I totally want to do this! I too have been the crazy lady who's walking in circles looking for stray sticks in her yard. If only the neighbors knew how cute our houses looked on the inside!
March 4, 2010 @ 11:49 pm
You are a genius!! These are so amazing! As I was skimming your post, I saw Ballard Designs and thought they must have surely come from there because they look so good! Good for you!
March 5, 2010 @ 4:38 pm
I love how those turned out! Great job!
-Trish
March 12, 2010 @ 6:06 pm
BEAUTIFUL kitchen. I'm so glad that you stopped to say hi. Come and see me again soon.
Happy Friday little lady!
March 14, 2010 @ 5:51 am
Oh my, these turned out fabulous – thanks for the tutorial!
Chelsea
August 3, 2010 @ 12:33 pm
Love it. And I love that you put your kitchen utensils in the urn. I have an urn just like that in my kitchen, but it's on a shelf. It's probably not deep enough for utensils, but you have inspired me to find a practical as well as decorative use for it. Thanks, Sister!
February 22, 2011 @ 3:26 am
Genius, Julie!!!! Love these little cuties! I'm saving this tutorial for later!!! Thanks for the great idea!
xoxo laurie
February 9, 2012 @ 11:07 pm
I've never seen the rub on letters before. Leave it to you!
Best to you,
Barbara